Create a Microsoft 365 Group
What is a Microsoft 365 Group
Section titled “What is a Microsoft 365 Group”When you create a Microsoft 365 Group, everyone in the group automatically gets shared tools to use together. This includes a shared email inbox and calendar in Outlook, shared files in OneDrive, and access to apps like Microsoft Teams if you choose to enable it.
Instead of giving access to each tool one by one, a Microsoft 365 Group keeps everything in one place. When you add someone to the group, they instantly get access to all the shared resources. When you remove them, their access is removed too.
Create a Microsoft 365 Group in Admin Center
Section titled “Create a Microsoft 365 Group in Admin Center”-
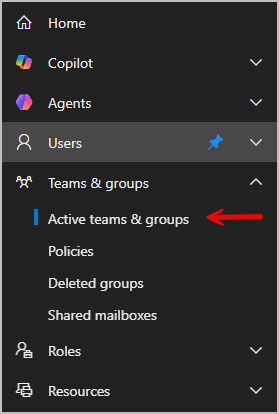
Sign into the Microsoft 365 Admin Center
-
Go to Teams & groups > Active teams & groups
-
Select Add a Microsoft 365 group

-
Basics - On the Basics tab, enter the group name and add a description. Click Next.
-
Owners - On the Owners page, select one or more people to be in charge of the group. Group owners can delete emails from the group inbox as regular members can’t. When you’re done, click Next.
-
Members - On the Members page, select one or more people you want to add to the group. Click Next once finished.
-
Settings - On the Settings page, enter a unique email address for the group. Then choose the privacy setting and decide if you want to add Microsoft Teams. Click Next when done.
-
Review your settings then select Create group then Close.
Add members to the group
Section titled “Add members to the group”-
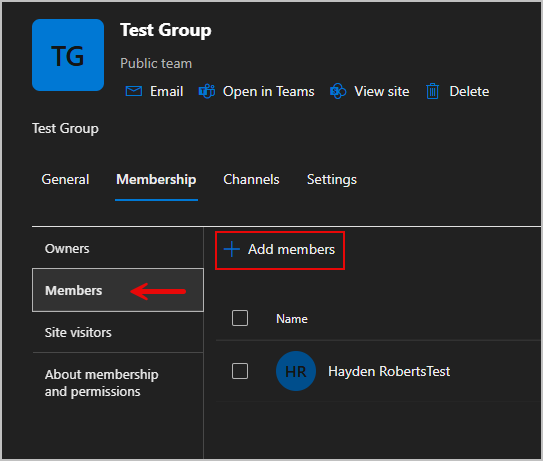
Select the group you just created.
-
Go to the Membership tab then select Members
-
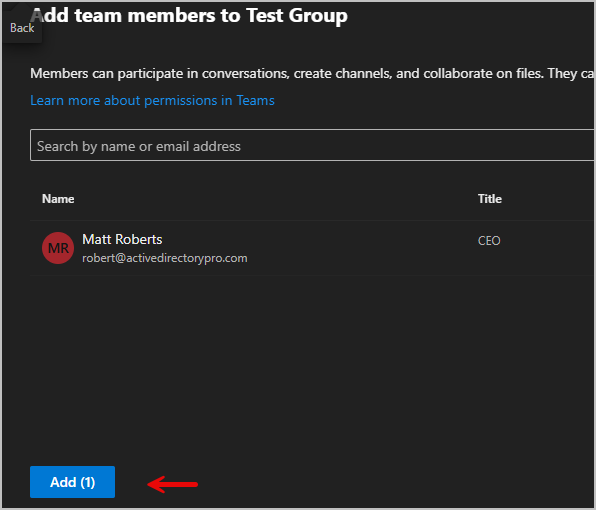
Search the members you want to add then select Save.
Create a 365 group with PowerShell
Section titled “Create a 365 group with PowerShell”-
Install Microsoft Graph (skip to step 2 if already installed)
Terminal window Install-Module -Name Microsoft.Graph -Scope CurrentUser -
Connect to Microsoft graph
Terminal window Connect-MgGraph -Scopes User.ReadWrite.All, Directory.AccessAsUser.All -
Copy the command and update the fields then run it.
Terminal window New-MgGroup -DisplayName "IT Team" -MailNickname "itteam" -GroupTypes "Unified" -MailEnabled:$true -SecurityEnabled:$false -Visibility "Private"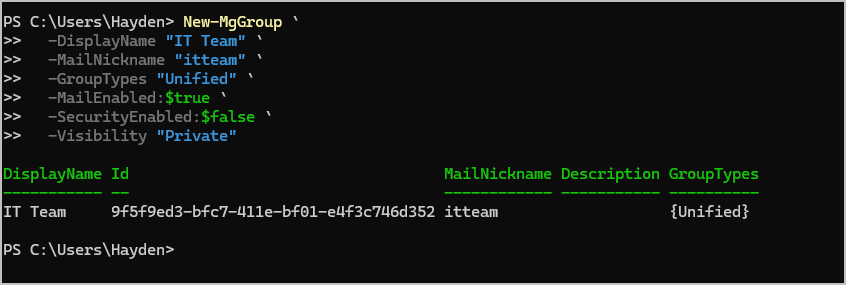
- Display Name - The name people see.
- MailNickname - The email alias.
- GroupTypes “Unified” - Makes it a Microsoft 365 Group.
- MailEnabled - Gives the group an email address.
- SecurityEnabled - Must be false for 365 groups.
- Visibility - You can have this as Public or Private.